
The scale, car type and dimensional specifications of both the prototype and model only pertain to the HO scale RPO's needed for my railroad. The specifics of my models should be considered secondary to the methods used, ether whole or in part, that could be useful in building a model for your railroad that may not be commercially available.
A Scratch-Bash
To avoid a total scratch building project, the technique used was to scratch build replacement sides, then apply these sides to a kit-bashed available kit.
Starting Point
A Branchline heavyweight coach kit was selected as a core because of its high level of detail, but more importantly is that the sides and roof are separate parts from the one piece molding that combines both the car ends and undercarriage/floor.
Unfortunately the overall length of the Branchline coach kit is too long at approximately 77' and not the exact 60' 11 5/8" over the end sheets dimension of the Bethlehem Steel built RPO's. An advantage though of the core kit being too long is that it can be shortened to the exact length desired. Adjusting the length of the core kit's roof and undercarriage assemblies to the prototype dimension by first removing the correct amount of material, then rejoining the pieces is therefore a prerequisite to the assembly of the replacement sides.
Make a Jig
The easiest and most accurate way to equally shorten the roof and undercarriage is to first make a jig sized to the dimension of the material that needs to be removed from the selected pieces, then using that jig to transfer this dimension to the pieces being physically being shortened.
Defining a jig as a device used to mechanically maintain the correct positional relationship of individual pieces during assembly or the relation between a tool and a piece of work during manufacture. In this case the jig is used to scribe the pieces for cutting. To insure a precise fit of individual parts in the end product, the jig itself should be fabricated as precise as possible. The degree of accuracy is up to the individual, I like to work within a tolerance of + or - .005".
Making and Using a Jig
One simple jig to shorten the car core was made from a flat piece of .010" thick styrene, sized to the width of the roof clearstory by the length (2.172") of material to be removed. Additionally, diagonal lines are marked on the jig to locate the center point of the jig.
For the purpose of positioning the jig onto the roof, small hole has been drilled where the diagonal lines intersect at the center of the jig and a corresponding same size hole has been drilled in the roof where the length and width centerlines of the roof intersect.
The drill bit used to drill both holes is now inserted into the roof, next the hole in the jig is slipped over the drill bit locating the jig properly centered on the roof for scribing.
In the photo below the jig has been squared up to the edges of the clearstory and is being used to scribe lines that mark the parameters of the material to be removed from the center of the roof.

A transverse line (the red line in the photo above) intersecting the center of the jig was also drawn for equally severing the jig into two pieces for use in the next step after the roofs have been completed.
The center section of the Branchline undercarriage has locating holes and fixtures for mounting the kit provided brake components. Retaining this section of the undercarriage makes sense, therefore equal size pieces were cut out of the undercarriage on ether side of the center section.
In the photo below the jig has been cut in half along the aforementioned red line and the now separate jigs have been located against the cross bearers on ether side of the center section. Lines are being scribed on one side of the jigs for cutting and the edge of the cross bearers will be used to position the saw blade on the opposite side.

Cutting the Pieces
Accurate and clean cuts are necessary for a good fit in the end product. Using the scribed lines as a guide, two cuts were made across the roof using a 10" compound miter saw with a general purpose blade. The use of this type of saw makes very clean precise cuts that are easily rejoined and will require only minimal work before painting.
Position the piece to be cut flat on the table and firmly against the fence.
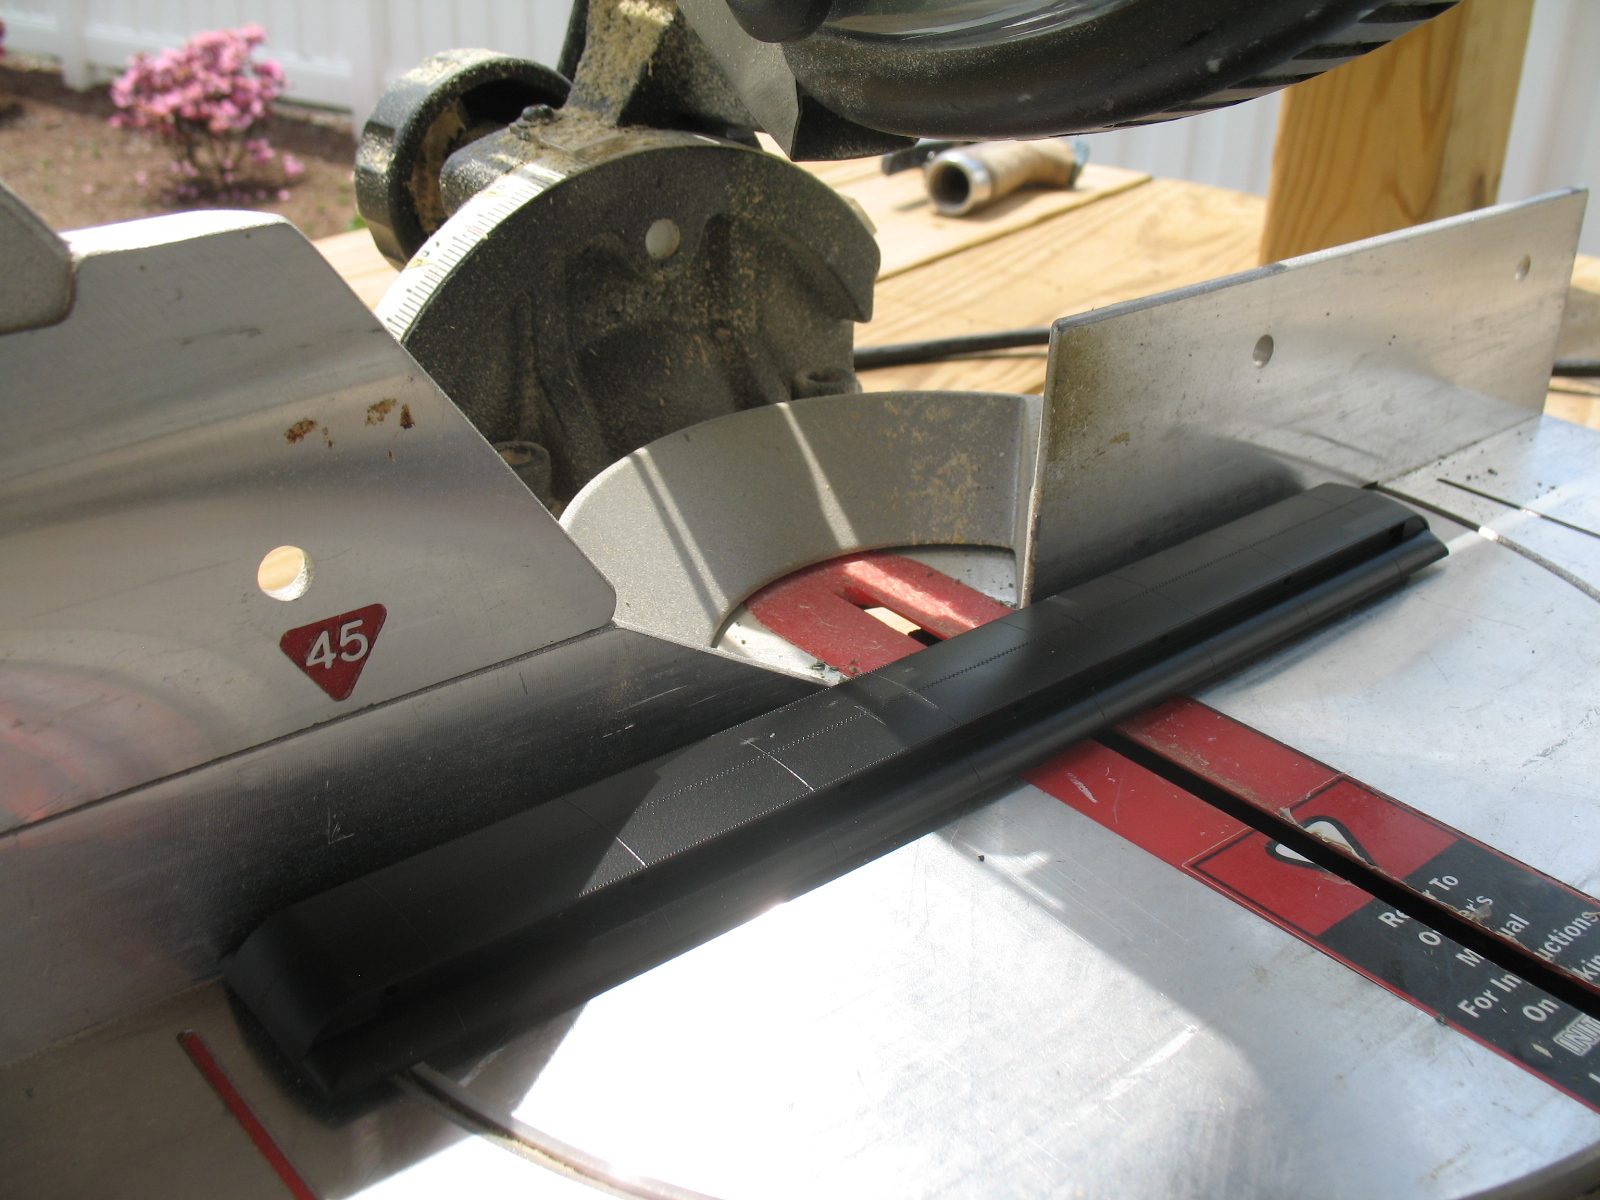
Cutting to the scribe line closest to the blade first. When the first cut is finished and the with the same side of the roof still firmly against the fence, feed the roof closer to the blade and make the second cut again using the scribe line as the guide.

Rejoining the Pieces.
The pieces are best rejoined on a flat work surface, I use a thick piece of glass taped to a drafting board for this. A straight edge is also necessary for proper alignment, taping a straight edge to the glass as in the photo below works well.

Again making sure the pieces to be rejoined are flat on the glass work surface and both pieces are firmly against the straight edge, a solvent glue for styrene is applied and the pieces are slid together to form a well fitting joint.
The photo below shows a stock size Branchline coach roof is at the top, the length of material removed in the center and the rejoined roof at the bottom.

The below photo again shows the three phases of shortening the undercarriage.

Part 2 will complete the core by modifying the car ends
No comments:
Post a Comment