
Life Like Proto 1000 DL-109
Several years ago when Life Like announced they were going to manufacture an affordable plastic Alco DL-109, New Haven modelers were astonished that any manufacture would even consider making them in the first place and looked forward to their release with great anticipation. The New Haven owned 60 DL-109's in the 1940's and 50's.
When these models were released I was very happy to have them because DL-109's had always been on the wish list but not enough to pay the price of available brass models.
I was disappointed though that the version released was more like the as delivered appearance than the way these locomotives looked in the mid 1950's that is my modeling era.
The prototype DL-109's were delivered with metal clad plywood sides with 6 windows on the engineer side and 7 windows on the fireman's side. After WWII welded on steel sheets replaced the plywood sides and the windows were removed, left open and covered with metal grills, this greatly changed the outward appearance of the locomotive sides.
The roofs as delivered had numerous vents/scoops for cooling, most of these were removed by the 50's and winterization hatches had been added, these details also needed to be changed on the models.
Re-Siding
An easy method to change these models to the 50's appearance was needed. The solution to updating the units came quite literally at a stop light one morning. While waiting for the light to change I was watching workers re-side a house, after the light had changed I was just down the street when it occurred to me that the method of re-siding could be an easy method to change the sides and roof. I guess I should have taken this cue from the prototype in the first place because that is exactly what they did but it did not occur to me at the time!
The photos below demonstrate the 50's appearance of the sides and roof desired.
The color of the temporary one off "The Cranberry" paint job on the 0722 shows the last version of the sides quite clearly in this photo.

This photo from 1957 shows the final version of both the sides and roof.

Below are two comparison photos, one of the sides and one of the roof. The Proto 1000 DL-109 as released is at the top and the re-sided unit at the bottom in the photos.


Styrene sheet of .005" thickness was used to make the re-siding panels for both sides and roof. After the replacement panels were made, all the protruding details and paint were removed from the sides of loco shell from the cab doors back to the rear corner of each side only saving the side doors and the two radiator intake shutters leaving a clean and smooth surface to glue the replacement panels to. Solvent glue would distort the thin styrene replacement panels therefore ACC type glue was used to adhere the panels to the sides of the shell. A small piece of styrene was used as a squeegee to spread the ACC evenly over the area being covered before placing the panels on the shell.
The below sequence photos shows the making of one of the replacement side panels. Clicking on these photos to enlarge then toggling between the four at the bottom of the post will be helpful.
The first photo points to the rivet detail that I wanted to emboss into the new panel to simulate the rivet strip that holds the new screening at top in place. This screening covers and protects the holes left open by the removal of the side windows.
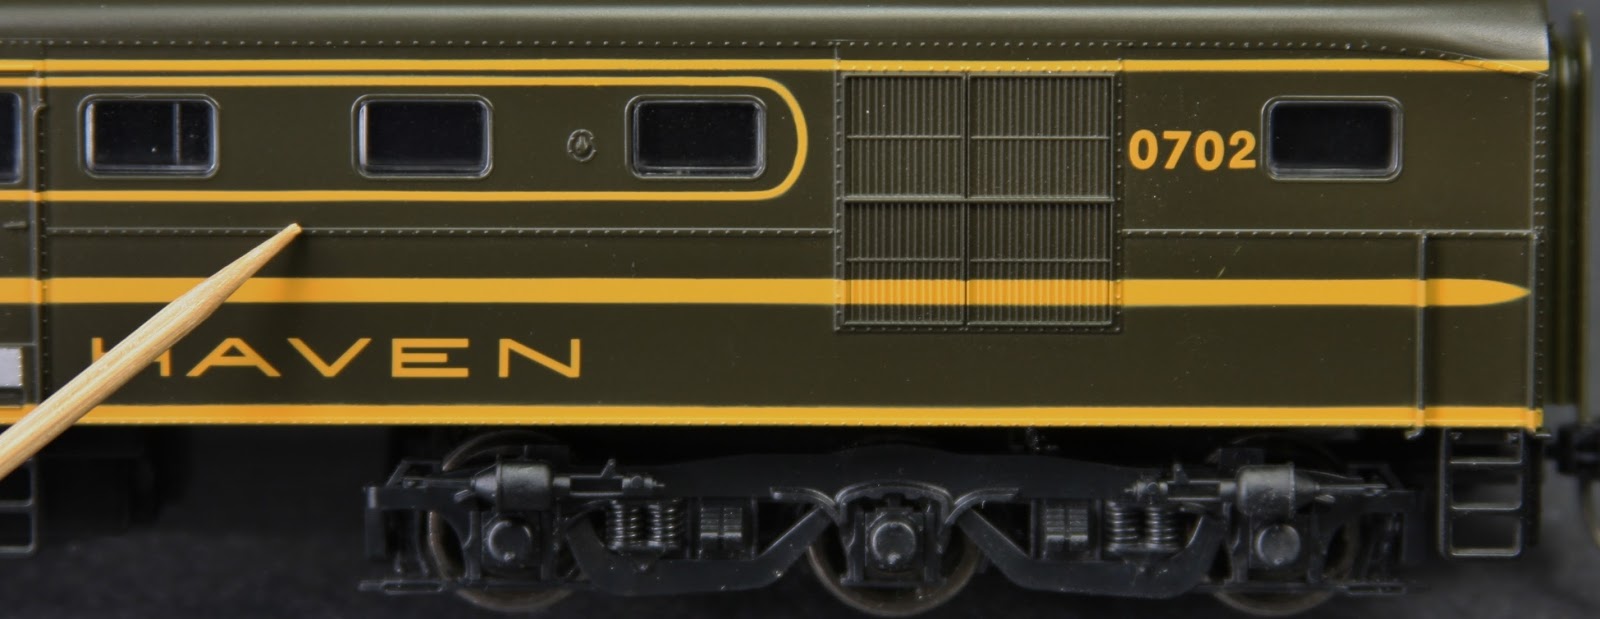
Second photo shows that a replacement panel has been cut to fit the area to be covered and temporarily placed over the factory molded strip of rivets. Then this strip of rivets is embossed into the new panel by rubbing over the detail with a toothpick transferring the detail into the new panel.This embossed rivet strip forms a "L" cross section giving the side screening a place to tuck behind like the prototype.

Third photo shows the new panel raised to the position on the shell that it will be glued to once the molded on detail and paint have been removed.

The fourth photo shows the panel in place on a finished shell.

It should be noted that I used an incorrect type of screening, it was all that was available at the time these models were built. The correct screening is the square type, not diamonds as seen in the above photo.
The "B" Unit
Because the re-sided model used in the photos is the "B" unit a short explanation is in order.
The New Haven converted one of the DL-109's for use as a B unit. For the conversion an ungainly looking nose door was added along with provisions for the necessary MU cables. Because of its looks this unit, #0727, has been called many unfortunate names by NH fans! Because it was different, I needed to model it.
Below is a photo of the prototype and the model.


Winterization Hatches
Winterization hatches were added to the DL-109's very soon after delivery. These hatches therefore can be correctly added to the as delivered type models.
Fellow New Haven Modeler Rob Gross came up with an easy solution to add these hatches to the models.
Cannon & Company #FS-1301 filter screens mounted side by side on a piece of styrene with two angles underneath make a very convincing representation of this needed detail.
See photos below.


A more ambitious re-siding project will be the subject of a future post.
I am presently building an S scale New Haven Cranberry DL109 I have done most of the conversions but I would like to ask some questions regarding the windows
ReplyDelete